Rules can help organize the Inbox by automatically moving
incoming mail into designated folders. Rules can help
organize incoming mail, rid spam from your Inbox, and flag
messages as they come in.
Below are the three mail parts that a Rule may have:
- Conditions: Conditions can be
messages from people or distribution lists, from
specified accounts, or marked messages such as High
Importance.
- Actions: This option allows you to
filter messages to different folders, make copies of
messages or delete messages.
- Exceptions: Exceptions can be made
to any rule created.
To create a new rule, follow the steps below:
In this example tutorial, a rule will be created to move
messages from the ALL list (everybody list) from the Inbox
to another folder that will be created.
- If not already in Mail View, click the button in the
Navigational Pane for Mail.
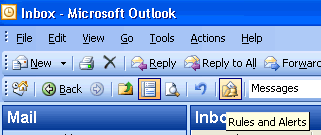
- On the Advanced Toolbar, click the Rules and
Alerts icon or from the Menu Toolbar go to
Tools > Rules and Alerts...
Figure 1
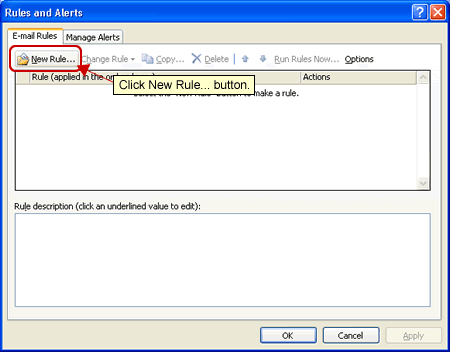
- The Rules and Alerts dialog box will display. Click
the New Rule... button.
Figure 2
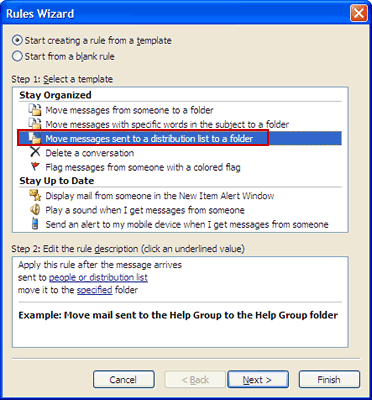
- The Rules Wizard dialog box will display. Select the
radio button next to Start creating a
rule from a template.
- Under Step 1, select the
type of rule you wish to create. For this example,
select Move messages from someone to
a folder.
Figure 3
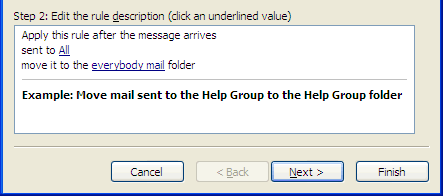
- Under Step 2, click the hyperlinked text,
people or distribution list. This will display
the Rule Address dialog box. Select the person(s) or
distribution list from Global Address List or your
contacts. In this example, the All list was chosen.
Next, select the hyperlinked text, specified.
This will open the Rules and Alerts dialog box. Select
the desired folder or create a new one to store messages
that will be moved by the new Rule. Click Next >.
Figure 4
- Check mark boxes next to any other more desired
conditions. For this example, no other conditions were
added. Click Next > when done.
- Check mark boxes next to any other more desired
actions. For this example, no other actions were added.
Click Next > when done.
- Check mark boxes next to any other desired
exceptions. For this example, no other exceptions were
added. Click Next > when done.
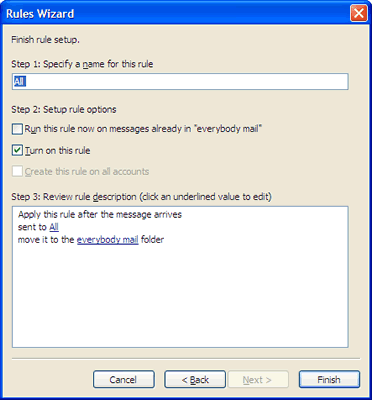
- The next screen is the Finish Rule Wizard. Under
Step 1, type a name for the new rule, then under step
two select desired options. Review the new rule under
step 3 and click Finish when done.
Figure 5
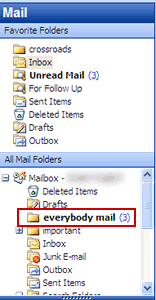
With this example all mail that is sent to
the All list is moved to the Everybody folder thereby
clearing out the Inbox of all messages from the All list.
Figure 6
Back | Top | |