Creating a New Appointment in Outlook 2003

Follow the steps below to create a new appointment in the Calendar.

  1. Click on the Calendar button in the left Navigation Pane to display Calendar View.
  2. Click the New button on the Standard Toolbar.

    Note: If you are in another folder (ie Mailbox) in Outlook, click the down pointing arrow next to the New button and from the drop down menu choose New Appointment.

    Figure 1
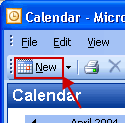
    New Appointment button

    The Appointment dialog box will appear.

    Figure 2
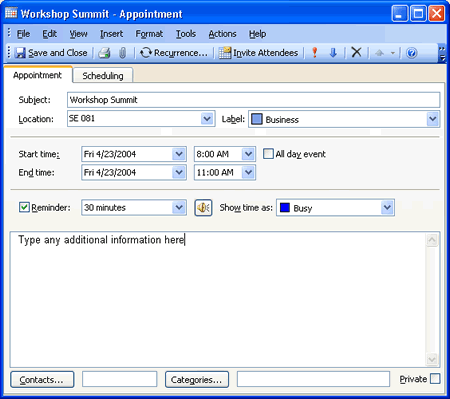
    New Appointment dialog box

  3. Fill out the Appointment form as follows:
    • Subject: The name of the Appointment ( ie. Workshop)
    • Location: The location of the Appointment (ie. SE 081)
    • Label: If desired, click the drop down menu and choose a label for the appointment. On the Calendar, the new appointment will display in the color of the label you choose.
    • Start time: Click the first drop down menu and choose a date for the new appointment. In the second drop down menu choose a start time for the appointment.
    • End time: Click the first drop down menu and choose an end date for the new appointment. In the second drop down menu choose a end time for the appointment.
    • All Day Event: If the appointment will be an all day event, check the checkbox next to All day event.

      Note: This option will hide the start time and end time.

    • Reminder: If you want to be reminded of an upcoming event, check the checkbox next to Reminder:. Click the drop down menu next to Reminder to select how many minutes, hours, or days in advanced you desired to be reminded of an upcoming event. If desired click the sound icon button to choose a different sound as the reminder sound.
    • Show time as busy: Click the drop down button and choose desired option.
    • Contacts: If desired, contacts from your personal Contacts folder can be added here. Select the desired person and click OK. This allows for quicker access to the contact when the Appointment dialog box is reopened from the Calendar. Click on the person's name until the person icon appears with a drop down menu and choose desired option.
    • Categories: Select the checkbox next to the desired category(s) for the appointment. Click Master Category List to create custom categories. Click OK when finished.
    • Private: Click the checkbox next to Private if you desired that people whom you share your calendar with do not see the details for the appointment.
  4. When finished with desired options for the new appointment, click the Save and Close button to close the New Appointment dialog box.

    Figure 12
    Save and Close button

  5. The new appointment will display on the calendar. To reopen the appointment, right-click over the appointment in the calendar and choose Open from the shortcut menu or double click the appointment.

    Figure 13
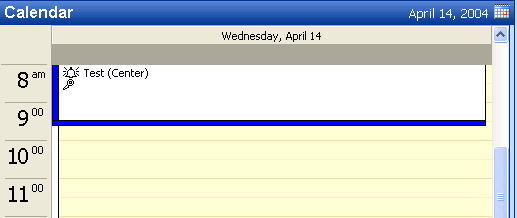
    Calendar with an appointment

Back| Top |